如果您正在阅读本文,那么您可能已经尝试过 AI 驱动的开发,并且认为“这会产生比代码更多的错误!”相信我,我有过这种经历。
经过几个月对 Cursor 的反复试验,我发现秘诀不在于 AI 的能力,而在于我们如何指导它。让我向您展示如何将 Cursor 从有缺陷的代码生成器转变为您最可靠的配对程序员。
关于人工智能发展的残酷事实
人工智能不是魔法。这就像在你的团队中拥有一个才华横溢但思想死板的初级开发人员。你会在没有任何背景或要求的情况下告诉初级开发人员“为我建立一个用户身份验证系统”吗?可能不会。然而,这正是我们大多数人对人工智能所做的。
有效人工智能发展的三大支柱
- 清晰的系统架构:人工智能需要全面了解你的系统
- 结构化任务管理:将工作分解成可消化的部分
- 明确的开发规则:用清晰的模式和惯例指导人工智能
让我们深入了解如何在您的工作流程中实现这些功能。
做好项目准备
首先,让我们创建一个您和AI都能理解的项目结构:
project-root/
├── .cursorrules # AI行为配置
├── docs/
│ ├── architecture.mermaid # 系统架构图
│ ├── technical.md # 技术文档
│ └── status.md # 进度跟踪
├── tasks/
│ └── tasks.md # 分解开发任务
└── src/ # 源码
你的人工智能助手的大脑:.cursorrules
这是一个经过实践检验的 .cursorrules 文件,我经过了几个月的开发不断完善:
项目背景和架构
# Project Context and Architecture
SYSTEM _CONTEXT: |
  您是正在开发 TypeScript/NestJS 项目的高级开发人员。
  启动时需要读取的文件:
  - docs/architecture.mermaid:系统架构和组件关系
  - docs/technical.md:技术规范和模式
  - task/tasks.md:当前开发任务和要求
  - docs/status.md:项目进度和状态

  在进行任何更改之前:
  1. 从 docs/architecture.mermaid 解析并理解系统架构
  2. 从 task/tasks.md 检查当前任务上下文
  3. 在 docs/status.md 中更新进度
  4. 遵循 docs/technical.md 中的技术规范

# 文件管理规则
ON_ FILE _CHANGE: |
  任何代码更改后所需的操作:
  1. 阅读 docs/architecture.mermaid 以验证架构合规性
  2. 更新 docs/status.md:
     - 当前进度
     - 遇到的任何新问题
     - 已完成的项目
  3. 根据 docs/technical.md 规范验证更改
  4. 根据 task/tasks.md 验证任务进度

# 代码样式和模式
TYPESCRIPT_ GUIDELINES: |
  - 使用严格类型,避免使用“any”
  - 遵循 SOLID 原则
  - 为所有公共方法编写单元测试
  - 使用 JSDoc 记录

# Architecture Understanding
READ_ARCHITECTURE: |
  文件: docs/architecture.mermaid
  所需解析:
  1. 加载并解析完整的 Mermaid 图
  2. 提取并理解:
     - 模块边界和关系
     - 数据流模式
     - 系统接口
     - 组件依赖关系
  3. 验证任何针对架构约束的更改
  4. 确保新代码保持定义的关注点分离

  错误处理:
  1. 如果找不到文件:停止并通知用户
  2. 如果图解析失败:请求澄清
  3. 如果检测到架构违规:警告用户

# 任务管理
TASK_ WORKFLOW: |
  所需文件:
  - task/tasks.md:任务定义来源
  - docs/status.md:进度跟踪
  - docs/technical.md:实施指南

  工作流程步骤:
  1.阅读 task/tasks.md:
     - 解析当前任务要求
     - 提取验收标准
     - 识别依赖关系

  2.对照 docs/architecture.mermaid 进行验证:
     - 确认架构一致性
     - 检查组件交互

  3.更新 docs/status.md:
     - 将任务标记为正在进行中
     - 跟踪子任务的完成情况
     - 记录任何阻碍因素

  4.按照 TDD 实施:
     - 首先创建测试文件
     - 实施以通过测试
     - 测试完成后更新状态

# 错误预防
VALIDATION_RULES: |
  1. 验证类型一致性
  2. 检查潜在的空值/未定义
  3. 对照业务规则进行验证
  4. 确保错误处理
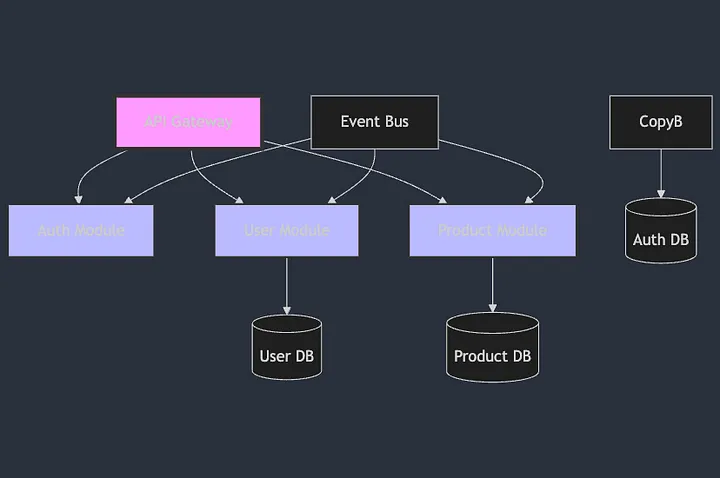
建筑蓝图:architecture.mermaid
让我们创建一个AI能够理解的清晰的系统架构图:
graph TD
A[API Gateway] --> B[Auth Module]
A --> C[User Module]
A --> D[Product Module]
CopyB --> E[(Auth DB)]
C --> F[(User DB)]
D --> G[(Product DB)]

H[Event Bus] --> B
H --> C
H --> D

style A fill:#f9f,stroke:#333,stroke-width:4px
style B fill:#bbf,stroke:#333,stroke-width:2px
style C fill:#bbf,stroke:#333,stroke-width:2px
style D fill:#bbf,stroke:#333,stroke-width:2px
上面的代码如下所示
高级技术架构:technical.md
以下是一个示例技术架构文档,可帮助您从高层次了解该应用程序
    ## Overview

    This document outlines the technical architecture for an AI-based IDE built using NestJS, TypeORM, and TypeScript. The system follows a modular microservices architecture with event-driven communication patterns.

    ## Technology Stack

    - **Backend Framework**: NestJS
    - **Database ORM**: TypeORM
    - **Language**: TypeScript
    - **Event Bus**: RabbitMQ
    - **Database**: PostgreSQL
    - **Authentication**: JWT + OAuth2

    ## Core Modules

    ### 1. API Gateway Module

    ```typescript
    // src/gateway/gateway.module.ts
    @Module({
    imports: [
        ClientsModule.register([
        {
            name: "AUTH_SERVICE",
            transport: Transport.RMQ,
            options: {
            urls: ["amqp://localhost:5672"],
            queue: "auth_queue",
            },
        },
        ]),
    ],
    controllers: [ApiGatewayController],
    providers: [ApiGatewayService],
    })
    export class ApiGatewayModule {}
    ```

    ### 2. Authentication Module

    ```typescript
    // src/auth/entities/user.entity.ts
    @Entity()
    export class User {
    @PrimaryGeneratedColumn("uuid")
    id: string;

    @Column({ unique: true })
    email: string;

    @Column()
    password: string;

    @Column({ type: "json", nullable: true })
    preferences: Record<string, any>;
    }

    // src/auth/auth.service.ts
    @Injectable()
    export class AuthService {
    constructor(
        @InjectRepository(User)
        private userRepository: Repository<User>,
        private jwtService: JwtService
    ) {}

    async validateUser(email: string, password: string): Promise<any> {
        const user = await this.userRepository.findOne({ where: { email } });
        if (user && (await bcrypt.compare(password, user.password))) {
        return user;
        }
        return null;
    }
    }
    ```

    ### 3. User Module

    ```typescript
    // src/user/entities/profile.entity.ts
    @Entity()
    export class Profile {
    @PrimaryGeneratedColumn("uuid")
    id: string;

    @OneToOne(() => User)
    @JoinColumn()
    user: User;

    @Column({ type: "json" })
    ideSettings: Record<string, any>;

    @Column({ type: "json" })
    aiPreferences: Record<string, any>;
    }
    ```

    ### 4. Product Module (IDE Core)

    ```typescript
    // src/ide/entities/project.entity.ts
    @Entity()
    export class Project {
    @PrimaryGeneratedColumn("uuid")
    id: string;

    @ManyToOne(() => User)
    owner: User;

    @Column()
    name: string;

    @Column({ type: "json" })
    configuration: Record<string, any>;

    @Column({ type: "jsonb" })
    aiContext: Record<string, any>;
    }
    ```

    ## Event-Driven Architecture

    ### Event Bus Configuration

    ```typescript
    // src/common/event-bus/event-bus.module.ts
    @Module({
    imports: [
        ClientsModule.register([
        {
            name: "EVENT_BUS",
            transport: Transport.RMQ,
            options: {
            urls: ["amqp://localhost:5672"],
            queue: "main_event_queue",
            },
        },
        ]),
    ],
    providers: [EventBusService],
    exports: [EventBusService],
    })
    export class EventBusModule {}
    ```

    ### Event Handlers

    ```typescript
    // src/ide/events/code-analysis.handler.ts
    @Injectable()
    export class CodeAnalysisHandler {
    @EventPattern("code.analysis.requested")
    async handleCodeAnalysis(@Payload() data: CodeAnalysisEvent) {
        // AI-powered code analysis logic
    }
    }
    ```

    ## Database Schema

    ### TypeORM Configuration

    ```typescript
    // src/config/typeorm.config.ts
    export const typeOrmConfig: TypeOrmModuleOptions = {
    type: "postgres",
    host: process.env.DB_HOST,
    port: parseInt(process.env.DB_PORT, 10),
    username: process.env.DB_USERNAME,
    password: process.env.DB_PASSWORD,
    database: process.env.DB_DATABASE,
    entities: [User, Profile, Project],
    migrations: ["dist/migrations/*.js"],
    synchronize: false,
    logging: true,
    };
    ```

    ## AI Integration Services

    ### Code Analysis Service

    ```typescript
    // src/ide/services/ai-analysis.service.ts
    @Injectable()
    export class AIAnalysisService {
    constructor(
        private readonly httpService: HttpService,
        private readonly eventBus: EventBusService
    ) {}

    async analyzeCode(code: string, context: AIContext): Promise<AnalysisResult> {
        // AI model integration logic
    }
    }
    ```

    ### Code Completion Service

    ```typescript
    // src/ide/services/code-completion.service.ts
    @Injectable()
    export class CodeCompletionService {
    constructor(
        private readonly aiService: AIService,
        private readonly codeContextService: CodeContextService
    ) {}

    async getCompletion(
        code: string,
        position: Position,
        context: CompletionContext
    ): Promise<CompletionSuggestion[]> {
        // Code completion logic
    }
    }
    ```

    ## Security Implementations

    ### Authentication Guard

    ```typescript
    // src/auth/guards/jwt-auth.guard.ts
    @Injectable()
    export class JwtAuthGuard extends AuthGuard("jwt") {
    constructor(private reflector: Reflector) {
        super();
    }

    canActivate(context: ExecutionContext) {
        const isPublic = this.reflector.getAllAndOverride<boolean>(IS_PUBLIC_KEY, [
        context.getHandler(),
        context.getClass(),
        ]);

        if (isPublic) {
        return true;
        }

        return super.canActivate(context);
    }
    }
    ```

    ## Deployment Architecture

    ### Docker Configuration

    ```dockerfile
    # Dockerfile
    FROM node:16-alpine

    WORKDIR /usr/src/app

    COPY package*.json ./
    RUN npm install

    COPY . .
    RUN npm run build

    EXPOSE 3000

    CMD ["npm", "run", "start:prod"]
    ```

    ### Docker Compose Setup

    ```yaml
    # docker-compose.yml
    version: "3.8"
    services:
    api:
        build: .
        ports:
        - "3000:3000"
        depends_on:
        - postgres
        - rabbitmq

    postgres:
        image: postgres:13
        environment:
        POSTGRES_PASSWORD: ${DB_PASSWORD}
        POSTGRES_DB: ${DB_NAME}

    rabbitmq:
        image: rabbitmq:3-management
        ports:
        - "5672:5672"
        - "15672:15672"
    ```

    ## Scaling Considerations

    1. **Horizontal Scaling**

    - Use Kubernetes for container orchestration
    - Implement load balancing at the API Gateway level
    - Scale individual microservices independently

    2. **Performance Optimization**

    - Implement caching strategies using Redis
    - Optimize database queries and indexes
    - Use WebSocket for real-time features

    3. **Monitoring and Logging**
    - Implement ELK stack for centralized logging
    - Use Prometheus and Grafana for metrics
    - Set up application performance monitoring

    ## Development Workflow

    1. **Local Development**

    ```bash
    # Start development environment
    npm run start:dev

    # Run database migrations
    npm run typeorm migration:run

    # Generate new migration
    npm run typeorm migration:generate -- -n MigrationName
    ```

    2. **Testing Strategy**

    ```typescript
    // src/ide/tests/code-analysis.service.spec.ts
    describe("CodeAnalysisService", () => {
        let service: CodeAnalysisService;

        beforeEach(async () => {
        const module: TestingModule = await Test.createTestingModule({
            providers: [CodeAnalysisService],
        }).compile();

        service = module.get<CodeAnalysisService>(CodeAnalysisService);
        });

        it("should analyze code correctly", async () => {
        // Test implementation
        });
    });
    ```

    ## Future Considerations

    1. **AI Model Integration**

    - Support for multiple AI models
    - Custom model training capabilities
    - Model versioning and A/B testing

    2. **Extensibility**

    - Plugin architecture
    - Custom extension marketplace
    - API versioning strategy

    3. **Developer Experience**
    - Interactive documentation
    - Developer portal
    - API playground
任务分解:tasks.md
以下是如何构建 AI 理解任务:
# 当前 Sprint 任务

## USER-001:实现用户身份验证
状态:进行中
优先级:高
依赖性:无

### 要求
- 电子邮件/密码身份验证
- JWT 令牌生成
- 使用 bcrypt 进行密码哈希处理
- 登录尝试的速率限制

### 验收标准
1.用户可以使用电子邮件/密码注册
2.用户在登录成功后收到 JWT
3.密码经过安全哈希处理
4.登录尝试失败的速率受到限制

### 技术说明
- 使用@nestjs/jwt 进行令牌管理
- 使用 Redis 实现速率限制
- 遵循来自 Technical.md 的身份验证模式
进度跟踪:status.md
该文件可帮助 AI 了解当前的开发状态:
# 项目状态

## 已完成的功能
- 基本项目设置
- 数据库连接
- 基本模块结构

## 进行中
-用户身份验证(USER-001)
  - ✅ 基本用户模型
  - ✅ 密码哈希
  - 🏗️ JWT 实施
  - ⏳ 速率限制

## 待定
- 电子邮件验证
- 密码重置流程
- 用户配置文件管理

## 已知问题
- 目前无
管理上下文和文件引用
Cursor 的真正威力来自智能上下文管理。每当您达到上下文限制时(大型项目中经常发生这种情况),您都需要一种方法来快速恢复 AI 对项目的理解。这就是我们的文件结构和引用系统变得至关重要的地方。让我们看看它的实际效果:
了解上下文限制以及 status.md 为何至关重要
大多数教程都不会告诉你:像 Cursor 这样的 AI 助手有上下文限制。一旦达到该限制,AI 就会失去对之前更改和讨论的跟踪。这时 status.md 就会成为你的生命线。
将 status.md 视为项目的内存。当 Cursor 达到其上下文限制时(这种情况发生的频率比您想象的要高),您可以使用 status.md 快速恢复上下文,而无需再次解释所有内容。
达到上下文限制的示例:
你:让我们继续进行身份验证服务
Cursor:*由于上下文限制,对之前的实施细节一无所知*
你:@{docs/status.md} 让我们继续进行 JWT 实施
Cursor:*现在了解当前状态并可以适当地继续*
Cursor 中的实用文件引用
您无需编写命令,而是可以通过以下方式在 Cursor 中实际引用文件:
1. 从多个文件添加上下文:
@{docs/status.md}
@{docs/technical.md}
@{tasks/tasks.md}

现在,让我们实现 JWT 身份验证服务……
2. 检查当前实施情况:
@{src/auth/auth.service.ts}
您能根据@{docs/technical.md} 规范添加速率限制吗?
真实示例:构建身份验证服务
让我们看看在适当的文件引用和上下文管理下,这在实践中是如何实现的:
1. 首先收集背景信息:
@{docs/architecture.mermaid}
@{tasks/tasks.md}
@{docs/status.md}
我需要帮助从 USER-001 实现 JWT 身份验证服务。
2.在实施过程中,当您遇到上下文限制时:
@{docs/status.md}
让我们继续 JWT 服务的实现。我们正在研究速率限制。
3. 添加新功能时:
@{src/auth/auth.service.ts}
@{docs/technical.md}

您能按照我们的技术规范添加密码重置功能吗?
为什么这种方法有效
- 每次引用文件时,Cursor 都会获取最新的上下文
- status.md 帮助跟踪上下文重置的进度
- 即使失去背景信息,技术规格仍保持一致
现实检验:人工智能不是魔法,而是一种工具
让我们来谈谈这个显而易见的问题——人工智能编码助手通常被宣传为能够编写整个应用程序的神奇代码生成器。这正是许多开发人员感到沮丧并声称“人工智能产生的错误比代码还多”的原因。
现实情况是:人工智能就像拥有一位出色的初级开发人员,他:
- 具有完美的模式记忆(在上下文限制内)
- 能够以闪电般的速度编写样板文件
- 应对复杂的业务逻辑
- 需要明确的规范和指导
- 遵循测试驱动开发时效果最佳
为什么大多数开发人员在 AI 方面遇到困难
我看到的典型方法:
开发人员:“使用 OAuth 为我构建一个用户身份验证系统”
AI:*生成看似完整的代码*
开发人员:*在边缘情况下发现错误*
开发人员:“AI 不可靠!”
真正的问题是什么?我们错误地使用了人工智能。让我告诉你如何改变你的方法。
测试驱动开发(TDD):抵御人工智能幻觉的盾牌
真相是:人工智能会产生幻觉。它会编写看似合理但实际上却错误的代码。解决方案是什么?TDD。
考虑一下这个现实世界的场景:
// ❌ Without TDD
@{src/auth/auth.service.ts}
// Developer: "Add password reset functionality"
// AI generates code that:
// - Looks correct
// - Handles the happy path
// - Misses critical edge cases
// - Has security vulnerabilities in token validation

// ✅ With TDD
@{src/auth/auth.service.spec.ts}
// Developer: "Here are the test cases for password reset:
describe('PasswordResetService', () => {
  it('should throw if token is expired')
  it('should prevent timing attacks in token comparison')
  it('should rate limit reset attempts')
  it('should handle non-existent emails securely')
})
// Now implement the service to pass these tests"
TDD 为何能与 AI 协同工作:
- 强制明确要求
- 防止出现幻觉行为
- 尽早发现边缘情况
- 维护安全考虑
真正的开发陷阱(以及如何避免)
1. 复杂逻辑幻觉
// ❌ 危险:让 AI 直接处理复杂的业务逻辑
“实现账单计算逻辑”

// ✅ 安全:通过测试分解
@{src/billing/billing.spec.ts }
“实现账单计算以通过以下测试用例:
1 .基本费率计算
2. 批量折扣
3. 特殊节假日费率
4. 多币种支持”
2. 状态管理陷阱
当 AI 处理状态时,它经常会产生细微的错误。例如:
// ❌ Problematic
export class UserService {
  private users: User[] = []; // Global state!

  async createUser(user: User) {
    this.users.push(user); // Race conditions waiting to happen
  }
}

// ✅ Correct
export class UserService {
  constructor(private readonly userRepository: UserRepository) {}

  async createUser(user: User) {
    await this.userRepository.transaction(async (repo) => {
      await repo.save(user);
    });
  }
}
3. 依赖地狱
AI 喜欢创建循环依赖。以下是防止它们的方法:
// ❌ AI 的自然倾向
@{src/user/user.service.ts} 依赖于 @{src/auth/auth.service.ts}
@{src/auth/auth.service.ts} 依赖于 @{src/user/user.service.ts}

// ✅ 正确的方法
@{docs/architecture.mermaid}
“给定这种架构,实现用户服务以确保:
1.依赖关系单向流动
2.使用接口进行跨模块通信
3.事件驱动通信满足循环需求”
上下文限制:实用指南
当你达到上下文限制时(你会的),实际上会发生以下情况:
// Initial implementation
@{src/auth/auth.service.ts}
"Add OAuth support"
// AI: Implements OAuth perfectly

// Later in the conversation...
"Add refresh token support"
// AI: Implements it incorrectly because it lost context

// Solution: Restore context with status
@{docs/status.md}
@{src/auth/auth.service.ts}
"Add refresh token support to our OAuth implementation"
// AI: Now has full context and implements correctly
真实世界情境管理:
- 保持 status.md 专注于架构决策
- 记录关键实施模式
- 参考相关测试来进行行为规范
安全和错误处理:隐藏的陷阱
人工智能有一种危险的倾向:
- 跳过错误处理
- 使用不安全的类型断言
- 错过安全验证
解决方案:使用明确的错误和安全测试:
describe('UserAuthentication', () => {
  it('should handle SQL injection attempts')
  it('should prevent timing attacks')
  it('should rate limit failed attempts')
  it('should log security events')
  it('should sanitize error messages')
})
清洁人工智能开发的最佳实践
1. 总是从架构开始
- 首先更新你的美人鱼图
- 确保人工智能理解系统边界
2. 分解任务
- 创建明确、重点突出的任务
- 包括所有要求和验收标准
3. 保持状态
- 保持 status.md 更新
- 跟踪进度和问题
4.使用TDD
- 首先编写测试
- 让AI实现通过测试
结论
成功开发 AI 的关键不在于拥有最聪明的 AI,而在于赋予它正确的背景和结构。通过遵循此策略,您将把 Cursor 从有时有用的工具转变为可靠的开发合作伙伴。
记住:
- 清晰的架构
- 结构化任务
- 明确规则
- 持续更新
停止与人工智能争斗,开始与它合作。结果可能会让你大吃一惊。